Translate

Wednesday, 13 February 2013

FOTD It IS easy being green

Hi Dearies,
Immaculate Collection Palette MUA
today I have for you a eyelook using my MUA eyeshadows shades 6 & 8, and from the Immaculate Collection; 15 and 18.

And I have to disagree with my friend (click for the video;-) Kermit


, with these lovely eyeshadows it IS easy being green.


I started with taking shade 8 and made a Vshape in my crease and under the lower lash line, then I used the same shade to line my upper lash line. Then I took shade 6 and dabbed it on the outer part of my eyelid. Then the lighter green (shade 15)of the Immaculate palette on the rest of the lid. Lastly the light golden one (shade 18) from the Immaculate palette on the inner corner and under the brow bone.

I thightlined with a dark brown eyepencil and added black mascara.
For my eyebrows I used the eyebrowkit from MUA, I used the lightest brow shade.

So what do you think, Is it easy being green?

Tuesday, 12 February 2013

Prepping for Valentine's day,DIY exfoliating mask

Hi Dearies, today I have for you a lush DIY recipe that will give you sumptuous soft skin. The perfect base for your Valentine's day make up.

Ingrediënts :

1 table spoon coconut milk              


1 teaspoon baking soda.

Mix the two tohether to make a litlle paste and applie it on your face, keep clear from the eyes. Now you can scrub the areas that need it the most, in my case nose, chin and forehead ( tipical t-zone) If you have sensitive skin or rosacea just let the mask sit on your face. 
Then just let the mask dry on your face, about 20/30 min, then rinse with luke warm water and gentle dab your face dry with a towel. You can have a litlle tingling sensation, especially if you have pimples, this is due to the fact baking soda is a kind of salt that desinfects the skin.

Now your skin will feel super soft and hydrated, due to the coconutmilk that left my skin feel nice and nourished I didn't feel the need for a moisturizer. And thats very rare with my skin.


I hope you enjoy the mask as much as I did.

Hugs and kisses DIY Mama

Monday, 11 February 2013

MUA Single eyeshadows

Hi dearies, last saturday I finally received my order from MUA. I ordered it from MUAstoreAll the eyeshadows are £1,- regular price, roughly €1,17, but now in this great offer I only paid £3/€3,51 for these six!

I knew it would take a bit longer due to the INCREDIBLE 50% off deal they had. As so many I waited for this beautifull deal to order all the goodies I had my eye on for a while now. But it's hard to stay patient if you know what beauties are coming. And here they are, I expected much, but it exceeded my expectations. I think I fell in love a bit ;-)

Now let's start with the swatches and reviews, and there will be much more to come in the next few weeks. Oh boy I'm so exited!

Pearl eyeshadows 1,4,6,8,9,12.

Shade 1, a beautiful rose champaign colour
Shade 4, light lilac rose 

Shade 6, a light green that has a golden glow over it.
Shade 8, a aqua turqoise
Shade 9, a dual toned purple with a beautifull blue sheen.
Shade 12, a warm toned brown with a golden green sheen.


Swatches daylight.

Swatches, artificial light.


First of all, all shades have a beautiful creamy texture and are a very pigmented. Especially shade 12, I only had to lightly dab my brush in, to get incredible payoff. All shades are buildable, so you can create the look you like, lightly shades by day, and spectacular by night.

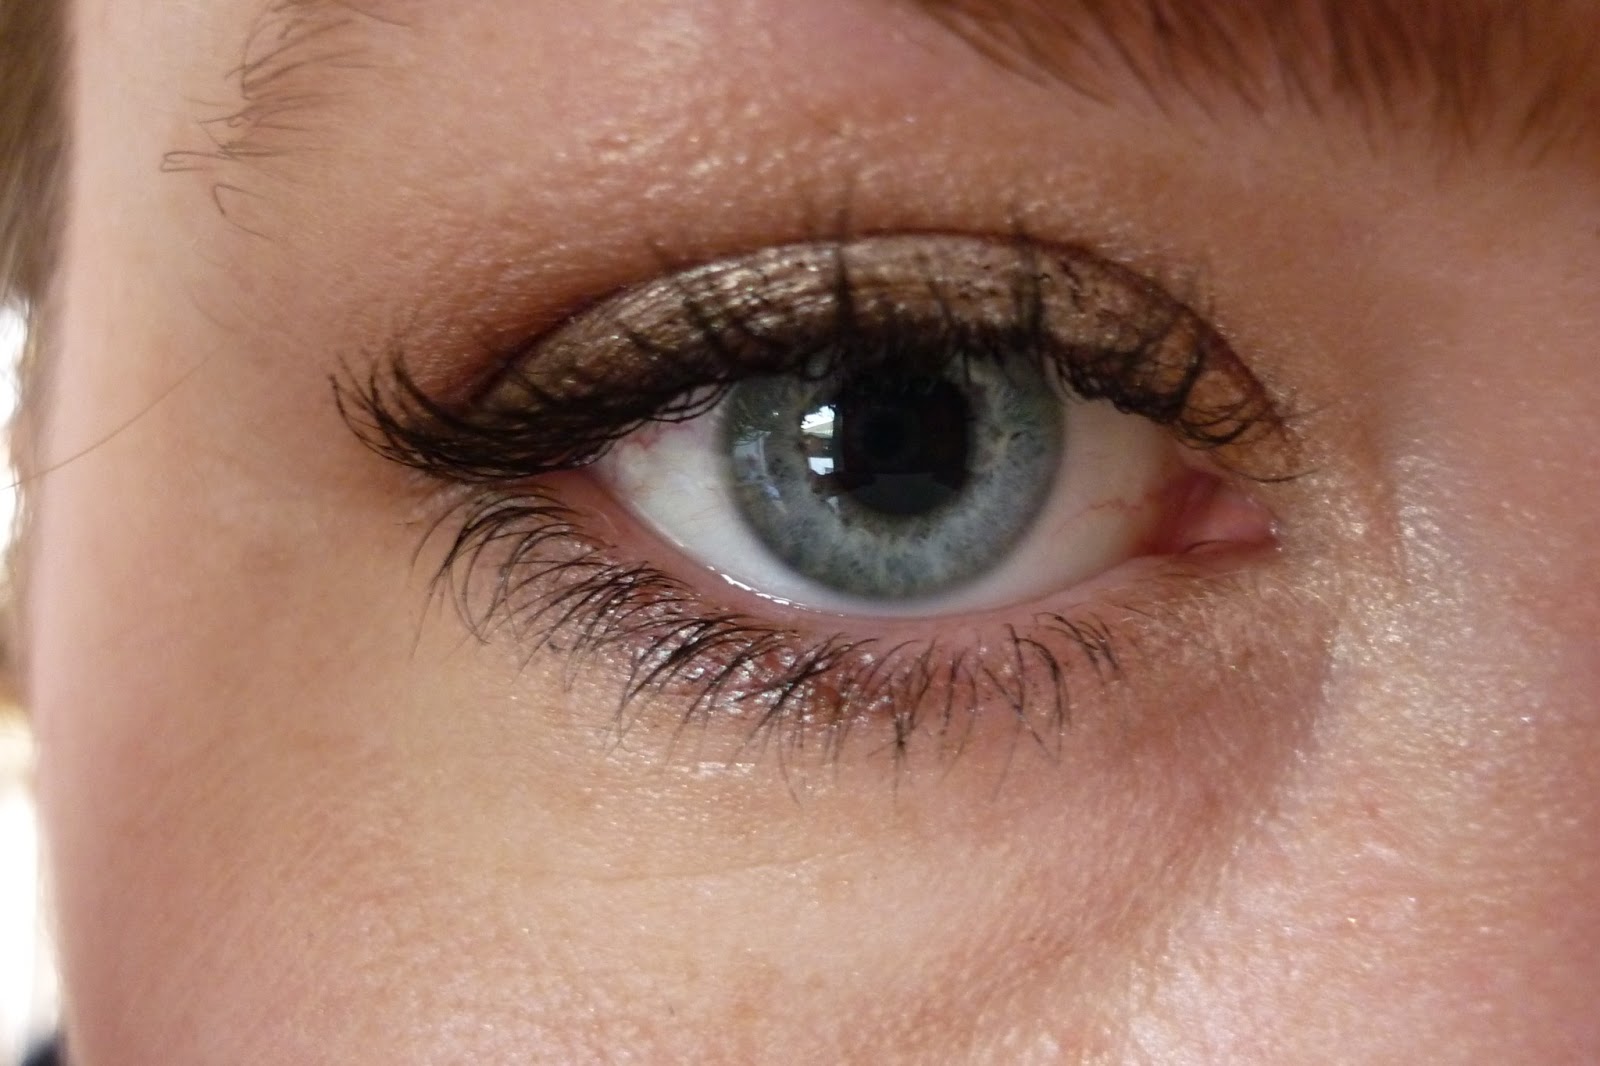
I created this daytime look with shades 1 and 12. 
I've put shade 1 in my inner corner, over the lid and under the browbone for higlight, and added shade 12 in a v-shape in my crease and under my bottom lashes. As I said, I really lightly dabbed my blending brush in, and blend blend blend ;-)
I finished with a brown eyeliner pencil on my top lashline and a black mascara.

 
  I hope you liked my post on these MUA Beauties.

Hugs and kisses DIY Mama


Saturday, 9 February 2013

Its here! My MUA order arrived!

Hi lovelies, my long anticipated order arrived. I knew it would take a while, but still couldn't wait to get my hands on these beauties.
I to waited for that beautiful 50% off sale, and ordered everything of my wishlist.
After studying YouTube reviews and several blogs I chose these beauties.
Tomorrow I'll post my swatch pictures for the single eyeshadows I got.
So "keep tuned";-)
Hugs and kisses DIY mama

Wednesday, 6 February 2013

Whipped Shea butter mix, ideal for dry skin

Hi today I have yet another DIY for you guys.
It's my beloved whipped shea butter mix, I use it for myself, my kids and even hubbie uses it after shaving. He is totaly not in to the creams and cosmetics thing, but recently asked me to make a new batch, because he really liked what this was doeing for his skin.

It's multi functional, I use it as:
- night cream, first aply a serum for moisture, than a thin layer shea mix,my skin is super soft in the morning.
- hand cream, I never seem to find a good handcrea, but this does the trick beautifully, and keeps them moisturized.
- feet cream, do use it over night with a pair of socks on.
- a all over body cream for my children, no chemicals, mineral oils, weird perfums that will irritate the skin. And if your skin is really sensitive you could leave out the oils as wel. But I recon that at least the tea tree oil contibutes to a healthy skin beacuse of its anti fungal and desinfecting properties.

Now with no further a do the recipe and intsructions.

Ingredients:

-Shea Butter, I prefer the raw and unreffined because of the healing properties. 


- Coconutoil.


- Tea tree oil. Because of the desinfecting and anti fungal properties, it is beneficiary for your skin aswel for the salve it self.


- Chi Davos kuurolie. This is for scenting only, so you could skip this.


Start by taking your hand mixer and bowl and put 3 heaped table spoons in the bowl, whip this up until the shea butter gets soft and fluffy like frosting. Then take another litlle bowl and melt 1 tablespoon coconut oil in the microwave. Add the melted coconutoil to the shea butter and mix, add 2 drops of tea tree oil and about 8- 10 drops of davos kuurolie ( a eucalyptus, mint blend). You'll should end up with a cake batter like consitancy.
And your done!

Hope you liked this recipe, and let me know if you tried it, how it worked out for you.

Please keep in mind that I'm no skin therapist, so please try the ingredients on a little patch. And shea butter is derrivided from the NUT of the shea tree, so people with nut allergies might have to keep that in mind.

That said, I have a realy sensitive skin, but have no reaction to this salve.

Have fun lovely's ,
hugs and kisses DIY Mama

Tuesday, 5 February 2013

DIY lippenbalsem/ lipbalm

Hoi, omdat ik door meerdere mensen gevraagd werd hoe ik mijn getinte lippenbalsem had gemaakt besloot dat ik het misschien maar op mijn blog moest gaan schrijven, dan kan iedereen het zien.

Hi, by popular demand (lol) i decided to take up my blog and post how i made my tinted lipbalm, for everyone to see.

Eigenlijk is het niet zo ingewikkeld;
de ingredienten die ik gebruikt heb

Basically its pretty easy, here are the ingredients i used:

- Bijenwas ( dit kon ik niet vinden in de winkels bij mij in de buurt, dus heb gewoon de stoute schoenen aan getrokken en ben bij een imker langs geweest en heb zo een halve kilo voor niks meegekregen. Kijk daar hou ik nou van!)

- Kokosolie ( bij de toko gehaald).

- Shea boter ( deze bij de afrikaanse toko in Den Haag gehaald, maar er is online ook het een en ander te vinden. Ik vind zelf de ongeraffineerde versie het prettigst, die is niet zo vettig als de geraffineerde versie, en die heeft meer goede eigenschappen dan de geraffineerde versie.)

- Roze pigmenten met shimmer van Essence " miss Piggy's lollipop.


-Beeswax ( I searched everywhere in the shops near me, but could not find it! So I thought " I'll just go to the source" I went to a beekeeper near me and called him to ask for some beeswax, he gave me half a kilo for free, gotta love that!)

-Coconutoil (I got that from my local "toko" it's a shop specialized in asian foods.)

-Shea Butter i got the unreffined and raw kind, it has more healing properties and is less sticky in my opinion, but it has a smell to it. But if you use little of it in the lipbalm you wont smell it, because of the lovely smell of the beeswax.

-Pink pigments, i used Essence " Miss Piggy's lollipop" but it's totally up to you ;-)

Toen ik dit maakte had ik nog niet bedacht dat ik er een " tutorial" van zou maken, dus heb geen foto's en geen afgemeten hoeveelheden. Het is allemaal een beetje op gevoel.

Je hebt van alles maar heel weinig nodig als je 1 lippenbalsem buisje wil vullen, ik heb daarom een wat grotere hoeveelheid lippenbalsem zonder kleur gemaakt, en die als basis genomen om kleur aan toe te voegen.

Hier kan je dan eenvoudiger een kleine hoeveelheid van pakken en daar je pigmenten aan toevoegen. Net zoveel als je zelf mooi vindt. Dit is mijn eind resultaat.

Making this I did'nt think I would make a tutorial of it, so i dont have the exact meassurments and pictures of the proces. I just winged it a little. If you add more beeswax it will turn up harder, if you use more oil or butter it wil be more soft. But if you start bij a 50/50 (50 wax/ 50 oil and butter)mix you should me good.

Because its hard to make such little it will fit just one lipbalm tube, I made a larger batch, and took just enough for one lipbalm melted it seperalty and added the pigments. The poured it in the tube and let it set in the fridge. This way you can add as much pigments as you like, and make a clear one for hubbie or brother ;-) This is a picture of the end result. Enjoy!


Hugs and kisses DIY Mama!

Monday, 2 July 2012

Making soap today, naptime DIY;-) voor het eerst zeep gemaakt!

Na al een poosje gezocht te hebben naar een goede castille zeep (olijfolie zeep), sterker gezegd überhaupt een castille zeep.
Heb ik dus maar besloten dat ik het zelf ga maken, en toevallig is dit dus het soort  DIY project waarvan ik nou niet gelijk dacht "dat kan ik zelf wel!", het werken met de loog opplossing in combinatie met twee kleine kinderen en een kat hielden me tegen.
Maar zoals gezegd kon ik dus nergens dergelijke zeep vinden, en wilde toch wel erg graag proberen en uitvinden waar nou alle fuss is all about. Het schijnt namelijk heel fijn voor je huidje te zijn, door hoge hoeveelheid glycerine die in de zeep blijft etc. Én hier zit geen sls of andere chemische dingen in, wel net zo fijn als je het ook voor je eigen kindjes wil gaan gebruiken. Maar mama gaat wel eerst als test cavia (guinee pig) fungeren uiteraard;-)  Kan ik zl (zoon lief) weer aan het lachen maken door te zeggen "ikke cavia" , maar het verhaal achter die running gag is voor een andere keer.

Dus een echt naptime DIY project, kindjes op bed en gaan met die banaan.
Alleen de kat was toch wel heel nieuwsgierig toen ik de hete loog oplossing buiten had staan....bijna weer zn snorharen in de krul hihi (combinatie gasfornuis + jonge kitten = gekrulde snorharen hihi).

Dus de olie en loog gemixt en gestaafmixert, is dat een woord? En jawel hoor t werkt ik heb trace! T spulletje staat nu in de oven voor het zo genaamde hot proces, en ziet er goed uit ben benieuwd!
Wordt vervolgd.......

Ik zal jullie laten weten hoe het eind product is geworden,
Groetjes en liefs DIY mama


After quite a while looking for a good castille soap (olive oil soap).
I have decided that I am going to make it my self, but this is not that kind of DIY that triggered my  "I can do it myself!" reflex. Working with the lye solution with two small children and a cat stopped me.
But as I said I couldn't find anynothing likethis soap, and wanted try and find out what all the fuss is all about now. It does seems easy on your skin due to the high amount of glycerin in the soap stays etc. andt here is no sls or other chemical things, just very pleasant if you want to use it for your kids. But Mom will be first the first guinea pig offcourse ;-) 
So a real naptime DIY project, children in bed and let it rip.
Only the cat was still very curious when he saw the hot lye solution had stood outside .... it almost curled his whiskers.
So the oil and lye mixed and "wandmixered", is that a word? And yes it works I have trace! The "yelly" is  now in the oven for the so-called hot process, and looks good'm curious!
to be continued .......

Hugs and kisses DIY Mommy


Saturday, 23 June 2012

Snelle ren sloffen!

Ook dit is een DIY project, het is al en tijdje geleden dat ik ze gemaakt heb maar zoon lief heeft ze in eens weer ontdekt. Hij heeft ze bestempeld als ren sloffen dus.


Saturday, 16 June 2012

Oil & vinegar baby.

De laatste tijd ben ik helemaal in to the diy and herbal cosmetics, veel op internet rond gekeken, en heb nu toch iets zo simpels gevonden tegen die luier uitslag van mn dochter.
Al weken, sinds de pinksteren, toen t zo warm was, heeft ze n luieruitslag uitslag die maar niet weg ging, ondanks smeren, laten luchten en al t andere wat ik al probeerde.
Maar ik heb t gevonden haar wonder middeltje: appel cider azijn, gewoon op een vochtig wattenschijfje en paar druppels azijn over de schone billetjes halen (ze waren rood en opgezet naar niet open, denk dat dat teveel zou prikken) en daarna smeer ik het in met een eigengemaakt zalfje van o.a. rijstolie,calendula, kokosolie en bijenwas

works like a charm! Wie interesse heeft ik kan het recept voor het zalfje wel naar je mailen, en echt moeilijk te maken is het ook niet. Groetjes DIY mama

Friday, 15 June 2012

Introductie

Als mama van twee kleine kinderen kom je vanzelf in de fase dat je kinderen zeggen of laten blijken "mama zelf doen!" Het lepeltje pakken met het eten, of zelf schoentjes aan willen doen, en dan vervolgens met bananen voetjes rond te lopen.
Allemaal heel gezond natuurlijk, want we willen als mama zijnde natuurlijk niet als ze 40 zijn de veters moeten strikken of de bammetjes moeten smeren.

Maar dat is de niet de reden dat ik deze blog geopend heb; want deze MAMA wil namelijk alles zoveel mogelijk zelf doen,n echte DIY mama if you like.
Van zelf t lampje of n douche kraan vervangen tot het maken van kleding en cosmetica. Bijna bij alles wat ik zie betrap ik me op de gedachte "goh kan ik dat niet zelf?"
Dus op deze blog zal ik jullie op de hoogte houden van mn protectjes, en wie weet breng ik anderen nog op leuke ideeën, want namelijk de meeste van mijn projectjes komen met behulp van t www en youtube tot stand.
Dus veel lees plezier!